JetEngine Glossaries are an invaluable asset for any WordPress site aiming for a dynamic and user-friendly experience. In this tutorial, we’ll guide you through the process of effectively utilizing JetEngine Glossaries on your WordPress site.
Prerequisites
Please make sure you have the following installed and activated:
JetEngine Taxonomy vs Glossary: What’s the Difference?
Understanding the difference between JetEngine Taxonomy and Glossary can help you make informed decisions about how to structure your data. Below is a table that breaks down the key differences:
| Feature | JetEngine Taxonomy | JetEngine Glossary |
|---|---|---|
| Purpose | Used to categorize and sort content within custom post types. | Lists of items used to populate fields in forms, custom post types, or for sorting options. |
| Flexibility | Hierarchical, allowing for parent and child categories for complex data structures. | Non-hierarchical, best for single-level lists of items. |
| Visibility | Appears as separate sections in the WordPress dashboard for easier management. | Managed within JetEngine settings and do not appear as separate sections in the WordPress dashboard. |
| Querying | Easily queryable, making it simple to filter and display content based on them. | Not as easily queryable as taxonomies for complex data relationships but can be used to filter content. |
When to Use Which?
- Use Taxonomy
When you need to categorize, sort, and filter content in a hierarchical manner. - Use Glossary
When you need a predefined list of options for fields in forms or custom post types.
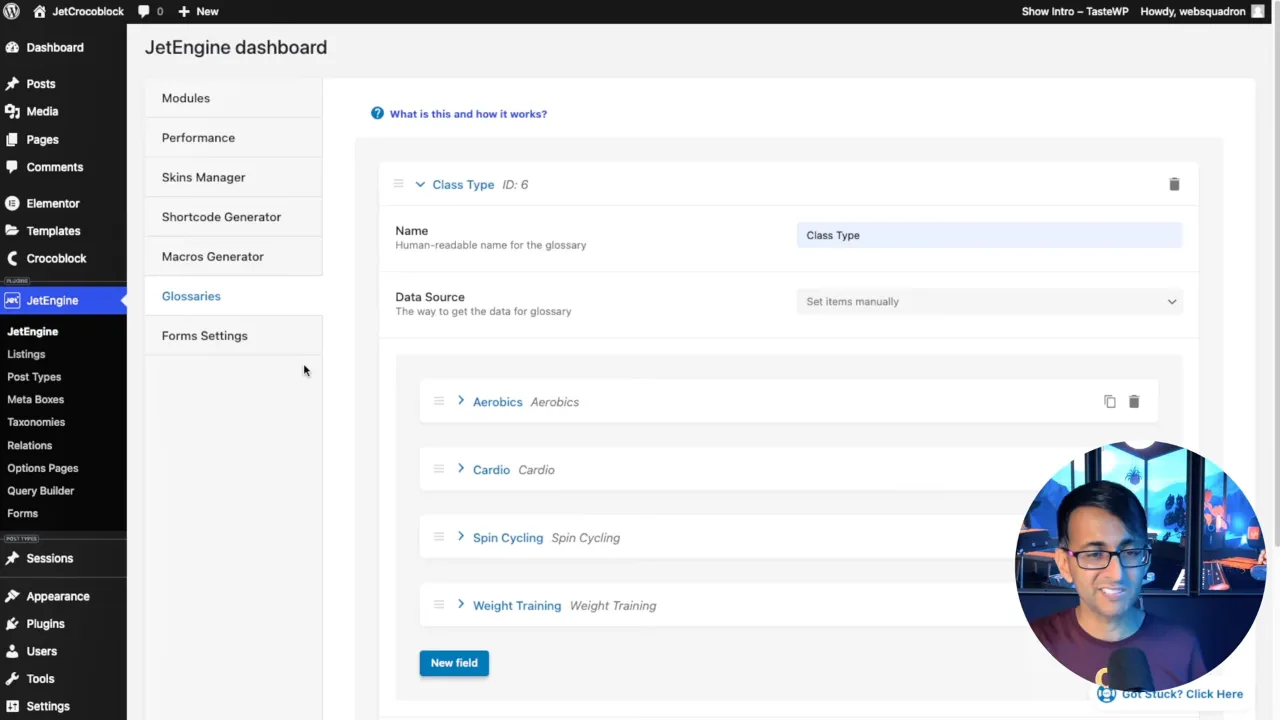
Creating Your First Glossary
- Navigate to
JetEngine > Glossariesin your WordPress dashboard. - Click on
Add Newto create a new glossary. - Enter the name of your glossary, for example, “Class Type”.
- Choose
Set items manuallyfor the data source. - Add your items manually by clicking
New Field. For example, you can add “Aerobics”, “Cardio”, “Spin Cycling”, and “Weight Training”. - Click
Saveto save your glossary.
Using Glossaries in Custom Fields
- Navigate to
JetEngine > Custom Fields. - Click
Add Newto add a new custom field. - Choose
Selectas the field type. - Select
Get options from the glossaryand choose your previously created glossary. - Click
Saveto save your custom field.
JetEngine Glossaries – Conclusion
JetEngine Glossaries offer a robust and efficient way to manage data across your WordPress site. By understanding how to create and implement glossaries, you can significantly improve the user experience and streamline your workflow.

