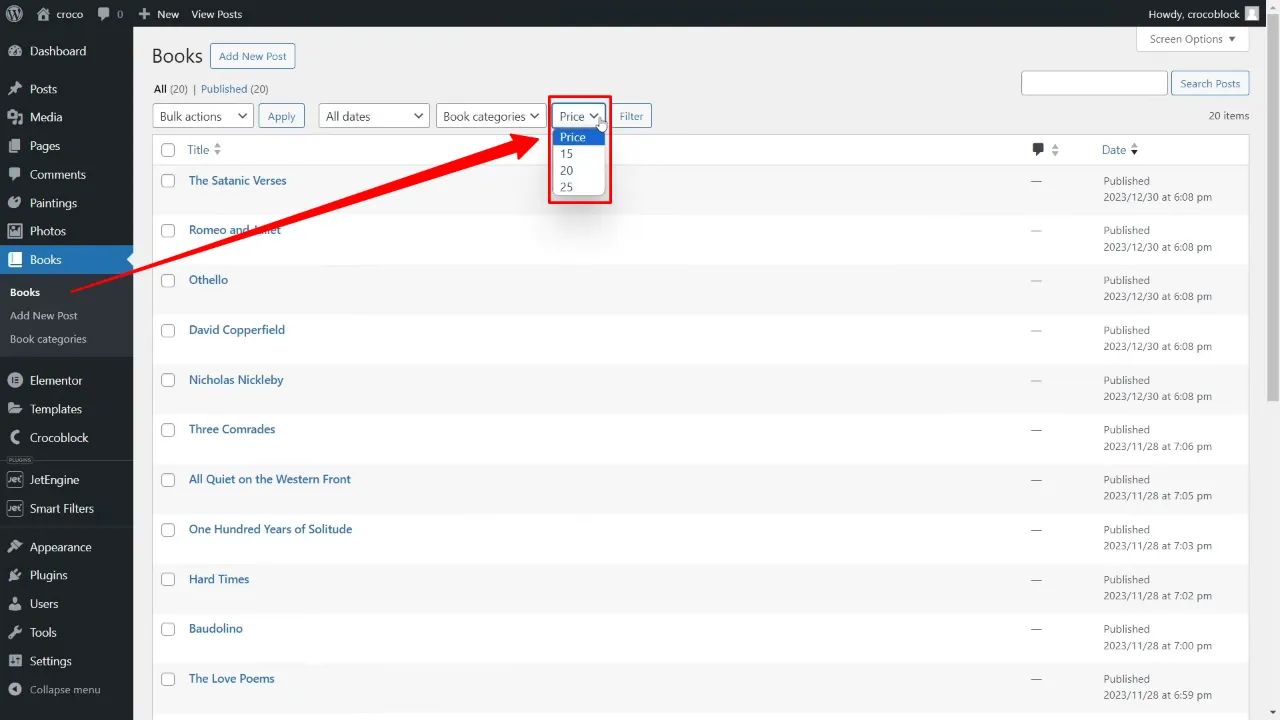
Creating WordPress Admin Filters for Custom Post Type becomes effortless with the JetEngine plugin. This tutorial walks you through the process of enhancing your backend admin dashboard’s functionality and making content management more intuitive.
Prerequisites
Please make sure you have the following installed and activated:
Benefits of Admin Filters for Custom Post Types (CPTs)
Admin filters for Custom Post Types (CPTs) in WordPress offer several advantages that can transform the way you manage content on your website. Here are some key benefits:
- Improved Organization
Admin filters enable you to sort and view CPTs based on specific criteria like taxonomy terms, meta field values, or glossary items. This makes it easier to find and manage content, especially when dealing with a large number of posts. - Enhanced Efficiency
By using filters, you can quickly access the posts you need without scrolling through irrelevant content. This efficiency is particularly valuable for websites with extensive and varied CPTs. - Customizable Interface
Admin filters allow you to tailor the WordPress backend to your specific needs. By displaying only relevant information, you can streamline your workflow and reduce clutter. - Better Content Management
Filters enable more precise control over your content. For instance, you can easily group posts into categories, assign tags, and manage metadata, which can be particularly useful for SEO and organizing content for visitors. - Dynamic Front-End Displays
The categorization and tagging facilitated by admin filters are not just beneficial for backend management. They also enable the creation of dynamic, custom listings and displays on your website’s front end, enhancing user experience. - Time-Saving Bulk Actions
Admin filters make it possible to perform bulk actions on specific groups of posts. For example, you could quickly update all posts in a certain category or with a specific tag, saving considerable time. - Increased Flexibility
With the ability to create filters based on custom criteria, you can adapt the admin interface to suit various types of content and user roles, providing a more flexible and user-friendly experience.
Instructions for WordPress Admin Filters for Custom Post Type with JetEngine
Note: We assume you already created your own CPTs (including tags and taxonomies) to continue with the following steps.
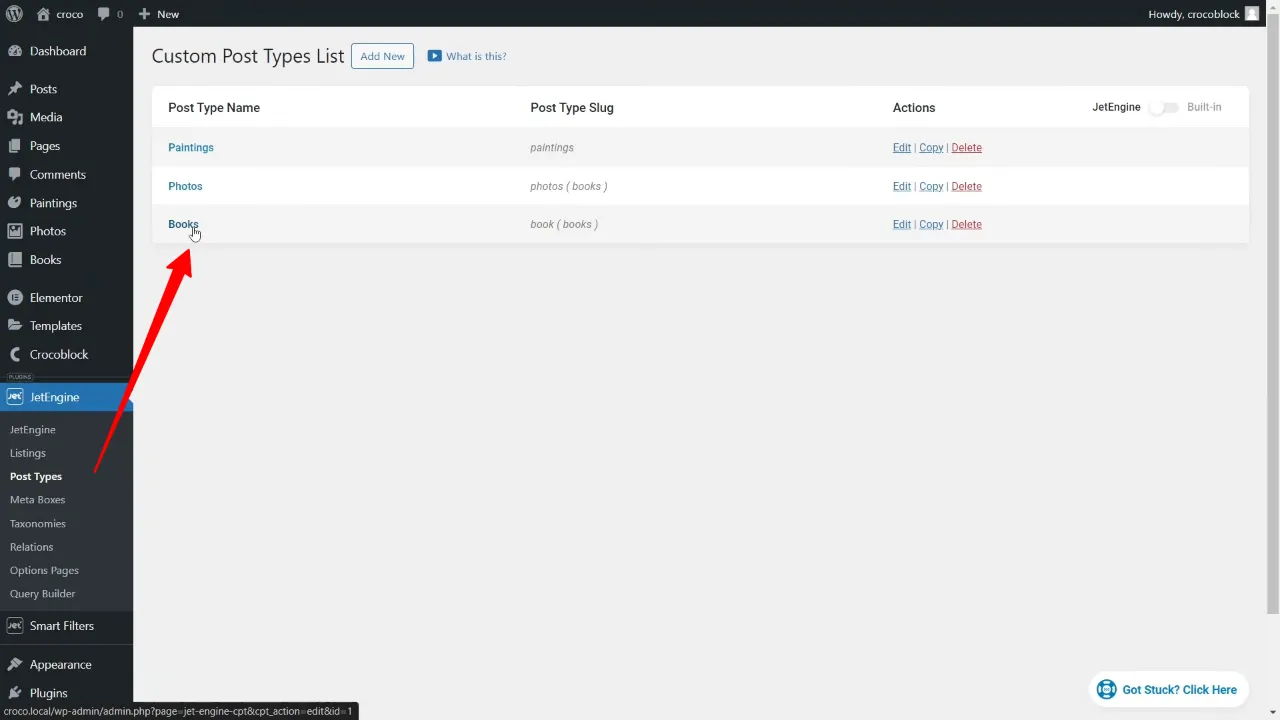
- Navigate to JetEngine > Post Types and click on the custom post type you want to add filters to (e.g. Books).
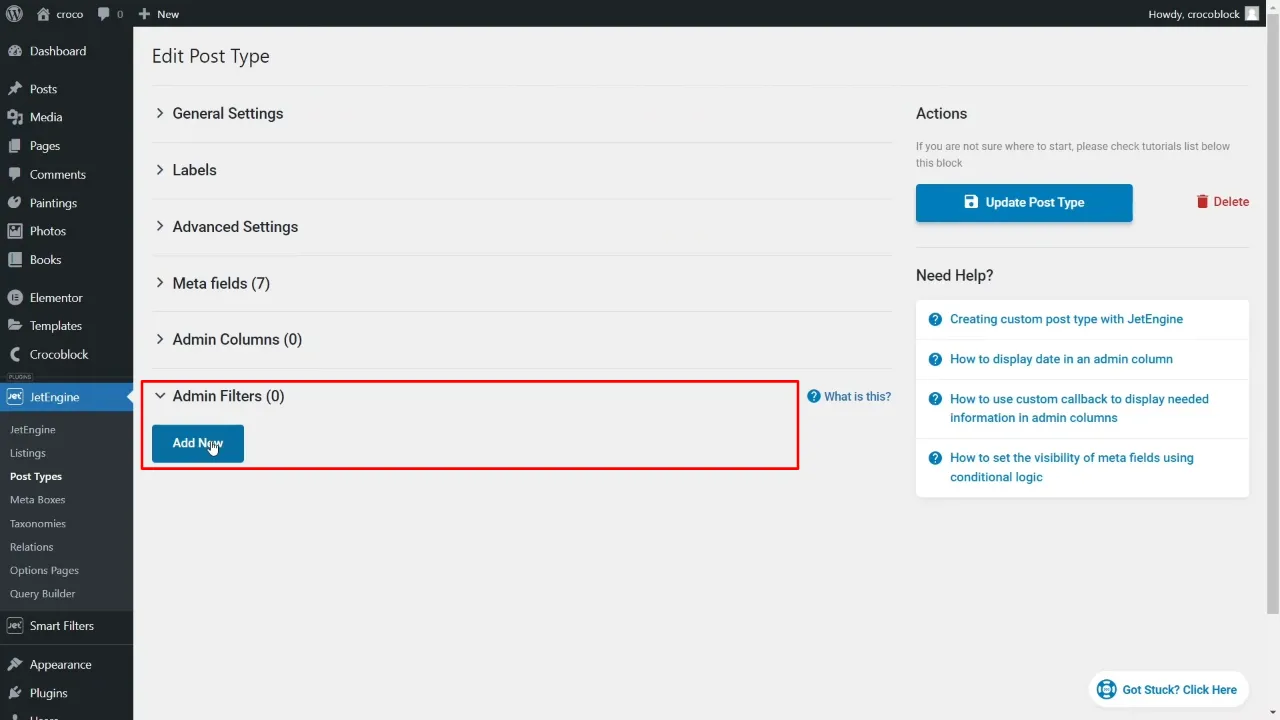
- Scroll down to the ‘Admin Filters’ section and click ‘Add New’.
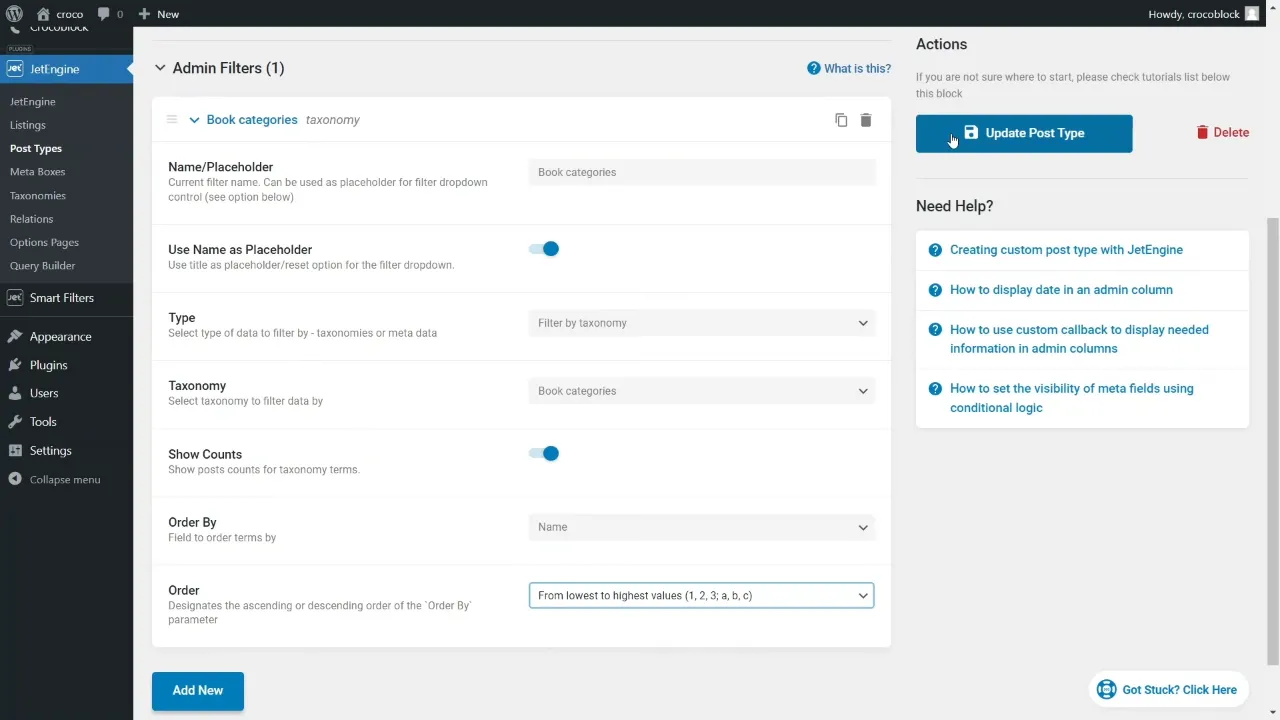
For creating a filter based on taxonomy:
- Name/Placeholder: Enter a filter name (e.g. Book categories).
- Type: Select “Filter by taxonomy”.
- Taxonomy: Select your category (e.g. Book categories).
- Order By: Select how you want to order the entries (e.g. Name).
- Order: Ascending or descending.
- Click on “Update Post Type” to save your changes.
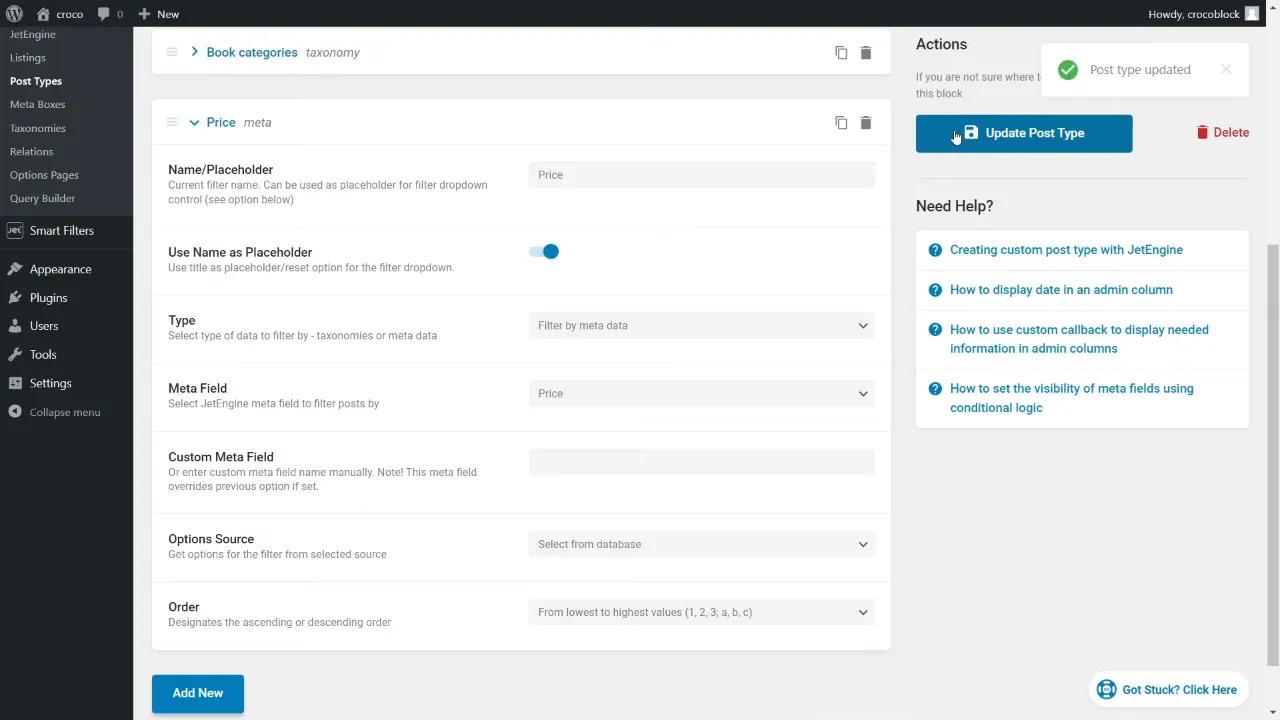
For a filter based on a meta field:
- Name/Placeholder: Enter a filter name (e.g. Price).
- Type: Select “Filter by meta data”.
- Meta Field: Select your meta field (e.g. Price).
- Options Source: “Select from database”.
- Order: Ascending or descending.
- Click on “Update Post Type” to save your changes.
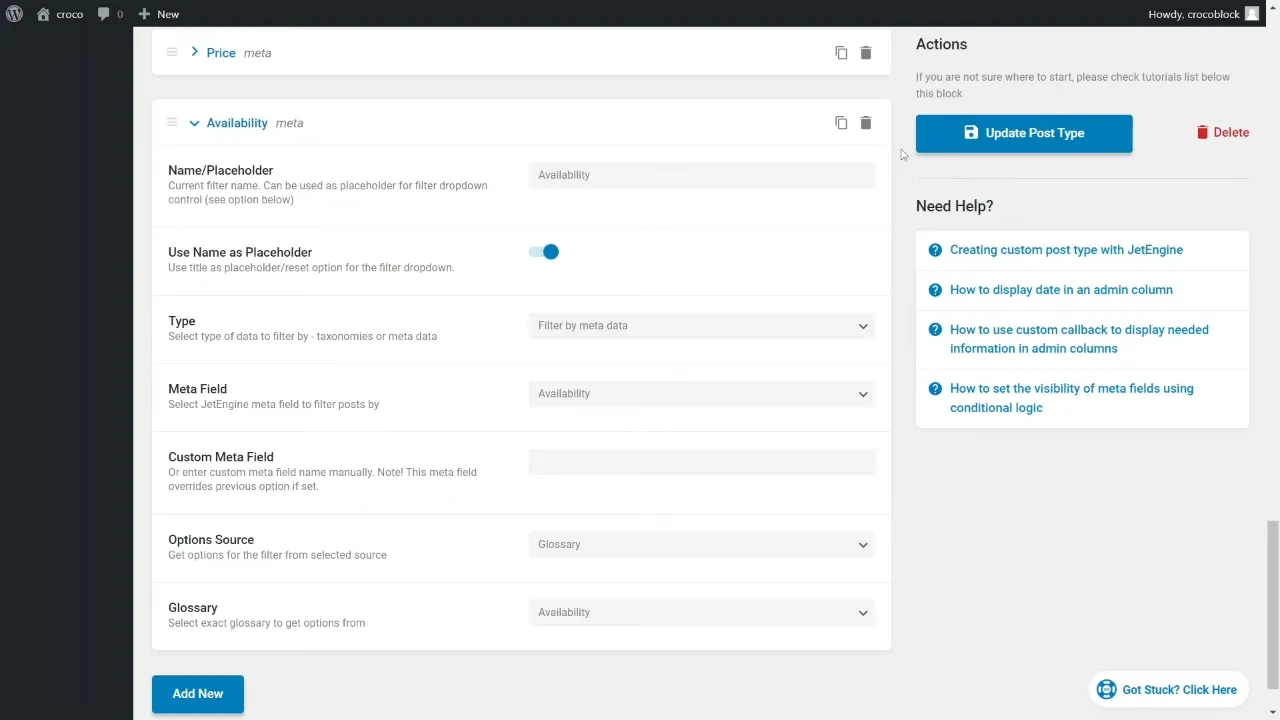
For a filter based on a glossary:
- Name/Placeholder: Enter a filter name (e.g. Availability).
- Type: Select “Filter by meta data”.
- Meta Field: Select your meta field (e.g. Availability).
- Options Source: “Glossary”.
- Glossary: Choose your glossary (e.g. Availability).
- Click on “Update Post Type” to save your changes.
Official Documentation
WordPress Admin Filters for Custom Post Type – Conclusion
With JetEngine, organizing and managing content in WordPress becomes a smooth experience. By adding admin filters to your custom post types, you can quickly sort and access posts based on specific attributes like taxonomy, meta field values, or glossary terms. This functionality not only streamlines your admin tasks but also lays the foundation for more dynamic and user-friendly front-end displays.

