CSS Grid layouts have revolutionized web design, offering unparalleled control and creativity in structuring page layouts. In this tutorial, we’ll explore how to visualize CSS Grids effortlessly using a CSS Grid Helper code snippet.
Prerequisites
Please make sure you have the following installed and activated:
Understanding CSS Grid Layout: A Beginner’s Guide
CSS Grid Layout is a powerful tool in web design, allowing you to create complex, responsive layouts with ease. Think of it like a game of Tetris, where you have control over where each block (or webpage element) fits on the screen.
What is CSS Grid Layout?
Imagine a grid on a webpage, like a chessboard. Each square on the chessboard represents a part of the webpage where you can place content, like text, images, or videos. CSS Grid Layout lets you create and control this grid, deciding how many squares it has and how big they are.
Real-Life Example
Consider a magazine layout. You have different sections – headlines, images, and articles. In a traditional layout, these elements might stack on top of each other. With CSS Grid, you can place the headline at the top, images in the middle, and articles in neatly organized columns and rows, just like arranging articles and images on a physical magazine page.
Why Use a CSS Grid
- Flexibility
You can place elements anywhere on the grid, not just stacked vertically. - Responsiveness
The layout adjusts to different screen sizes, making your website look good on phones, tablets, and computers. - Ease of Use
Once you set up the grid, placing elements becomes much simpler and more intuitive.
CSS Grids with a CSS Grid Helper Code Snippet
- Navigate to Snippets > Add New.
- Copy the CSS Grid Helper code snippet below and add a title:
/**
 * CSS Grid Helper for Elementor
 *
 * This plugin, created by Mark Harris, is designed for use with the Elementor page builder
 * in WordPress. It allows you to easily generate CSS code for defining grid layouts
 * within Elementor using CSS Grid. You can customize the number of rows and columns
 * and add multiple block sets with specific grid positions.
 *
 * Instructions:
 * 1. Enter the total number of rows and columns in the grid.
 * 2. Add block sets with specific grid positions (start and end rows/columns).
 * 3. Click "Generate Block CSS" to generate the CSS code.
 *
 * The generated CSS code will be displayed below and can be used in your Elementor custom CSS settings.
 *
 * Author: Mark Harris
 * Version: 1.0
 *
 * @package CSS_Grid_Helper
 * @version 1.0
 */

// Add a new menu item in the WordPress admin for the CSS Grid Helper
function css_grid_helper_add_admin_page()
{
    add_menu_page(
        "CSS Grid Helper", // Page title
        "CSS Grid Helper", // Menu title
        "manage_options", // Capability
        "css-grid-helper", // Menu slug
        "css_grid_helper_admin_page", // Function to display the page
        "dashicons-layout", // Icon
        110 // Position
    );
}

// Display the admin page content
function css_grid_helper_admin_page()
{
    ?>
    <div class="wrap">
        <h1>CSS Grid Helper</h1>
        <form id="css-grid-helper-form">
            <h2>Grid Size</h2>
            <div class="input-group">
                <label for="grid-rows">Total Rows:</label>
                <input type="number" id="grid-rows" name="grid_rows" min="1" value="4">
            </div>

            <div class="input-group">
                <label for="grid-columns">Total Columns:</label>
                <input type="number" id="grid-columns" name="grid_columns" min="1" value="4">
            </div>

            <h2>Block Position and Span</h2>
            <div class="block-set">
                <h3>Block Set 1</h3>
                <div class="input-group">
                    <label for="block-start-row">Start Row:</label>
                    <input type="number" class="block-start-row" name="block_start_row" min="1" value="1">
                </div>

                <div class="input-group">
                    <label for="block-end-row">End Row:</label>
                    <input type="number" class="block-end-row" name="block_end_row" min="1" value="2">
                </div>

                <div class="input-group">
                    <label for="block-start-column">Start Column:</label>
                    <input type="number" class="block-start-column" name="block_start_column" min="1" value="1">
                </div>

                <div class="input-group">
                    <label for="block-end-column">End Column:</label>
                    <input type="number" class="block-end-column" name="block_end_column" min="1" value="2">
                </div>
            </div>

            <button id="add-block-set" type="button" class="button button-secondary">Add Block Set</button>
            <input type="submit" class="button button-primary" value="Generate Block CSS">
        </form>

        <h2>Generated Block CSS</h2>
        <textarea id="generated-css" rows="5" readonly></textarea>

        <h2>Grid Preview</h2>
        <div id="grid-preview" class="grid-container">
            <!-- Grid items for visualization will be added here -->
        </div>
    </div>

    <!-- JavaScript Section -->
    <script type="text/javascript">
    jQuery(document).ready(function($) {
        var blockSetColors = ['#FFA07A', '#20B2AA', '#778899', '#9370DB', '#3CB371', '#FFD700',
                              '#FF6347', '#4682B4', '#DA70D6', '#32CD32', '#FF4500', '#6A5ACD'];

        var totalRows = parseInt($('#grid-rows').val(), 10);
        var totalColumns = parseInt($('#grid-columns').val(), 10);

        function updateGridContainerStyle() {
            var gridContainer = $('.grid-container');
            gridContainer.css({
                'grid-template-columns': 'repeat(' + totalColumns + ', 50px)'
            });
        }

        function validateBlockSetInput() {
            $('.block-set').each(function() {
                $(this).find('.block-start-row, .block-end-row').attr('max', totalRows);
                $(this).find('.block-start-column, .block-end-column').attr('max', totalColumns);
            });
        }

        function updateGridPreview() {
            var gridPreview = $('#grid-preview');
            gridPreview.empty();

            for (let row = 1; row <= totalRows; row++) {
                for (let col = 1; col <= totalColumns; col++) {
                    gridPreview.append($('<div class="grid-item">R' + row + ' C' + col + '</div>'));
                }
            }

            var css = '';
            $('.block-set').each(function(index) {
                var startRow = parseInt($(this).find('.block-start-row').val(), 10);
                var endRow = parseInt($(this).find('.block-end-row').val(), 10);
                var startColumn = parseInt($(this).find('.block-start-column').val(), 10);
                var endColumn = parseInt($(this).find('.block-end-column').val(), 10);

                var blockColor = blockSetColors[index % blockSetColors.length];

                var blockCss =
                    "/* Block " + (index + 1) + " */\n" +
                    "selector {\n" + // Replace "selector" with your custom selector
                    "    grid-row: " + startRow + "/" + (endRow + 1) + ";\n" +
                    "    grid-column: " + startColumn + "/" + (endColumn + 1) + ";\n" +
                    "}\n";
                css += blockCss;

                $('#grid-preview .grid-item').each(function() {
                    var itemRow = parseInt($(this).text().match(/R(\d+)/)[1], 10);
                    var itemCol = parseInt($(this).text().match(/C(\d+)/)[1], 10);

                    if (itemRow >= startRow && itemRow <= endRow && itemCol >= startColumn && itemCol <= endColumn) {
                        $(this).css('background-color', blockColor);
                    }
                });
            });

            $('#generated-css').val(css);
            updateGridContainerStyle();
        }

        function updateBlockSetLabels() {
            $('.block-set').each(function(index) {
                var blockColor = blockSetColors[index % blockSetColors.length];
                $(this).find('h3').html('Block Set ' + (index + 1) + ' <span class="color-indicator" style="background-color: ' + blockColor + ';"></span>');
            });
        }

        function addBlockSet() {
            var blockSet = $('.block-set').first().clone();
            blockSet.find('input').val('');
            $('.block-set').last().after(blockSet);

            updateBlockSetLabels();
            updateGridPreview();
            validateBlockSetInput();
        }

        $('#add-block-set').click(function() {
            addBlockSet();
        });

        $('#grid-rows, #grid-columns').change(function() {
            totalRows = parseInt($('#grid-rows').val(), 10);
            totalColumns = parseInt($('#grid-columns').val(), 10);

            validateBlockSetInput();
            updateGridPreview();
        });

        $('#css-grid-helper-form').submit(function(event) {
            event.preventDefault();
            updateGridPreview();
        });

        updateBlockSetLabels();
        updateGridPreview();
        validateBlockSetInput();
    });
</script>


    <!-- CSS Section -->
    <style type="text/css">
        .wrap {
            margin: 20px;
        }
        .input-group {
            margin-bottom: 15px;
        }
        label {
            display: block;
            margin-bottom: 5px;
        }
        input[type="number"] {
            width: 50px;
        }
        .button-secondary {
            margin-left: 10px;
        }
        #generated-css {
            width: 100%;
            font-family: monospace;
            background-color: #f7f7f7;
            border: 1px solid #ccc;
            padding: 10px;
        }
        .grid-container {
            margin-top: 20px;
            max-width: 100%;
            display: grid;
            grid-template-columns: repeat(4, 50px);
            grid-gap: 4px;
            background-color: #fff;
            padding: 4px;
        }
        .grid-container .grid-item {
            background-color: rgba(255, 255, 255, 0.8);
            border: 1px solid rgba(0, 0, 0, 0.8);
            padding: 8px;
            font-size: 14px;
            text-align: center;
            overflow: hidden;
            transition: background-color 0.3s;
        }
        .block-set {
            background-color: #f0f0f0;
            border: 1px solid #ccc;
            padding: 10px;
            margin-top: 20px;
        }
        .block-set h3 {
            margin: 0;
            padding: 0;
            font-size: 16px;
        }
        .color-indicator {
        display: inline-block;
        width: 15px;
        height: 15px;
        border-radius: 50%;
        margin-left: 10px;
        vertical-align: middle;
    }
    </style>
    <?php
}

add_action("admin_menu", "css_grid_helper_add_admin_page");
Source: Code Snippets

- Save changes and activate.
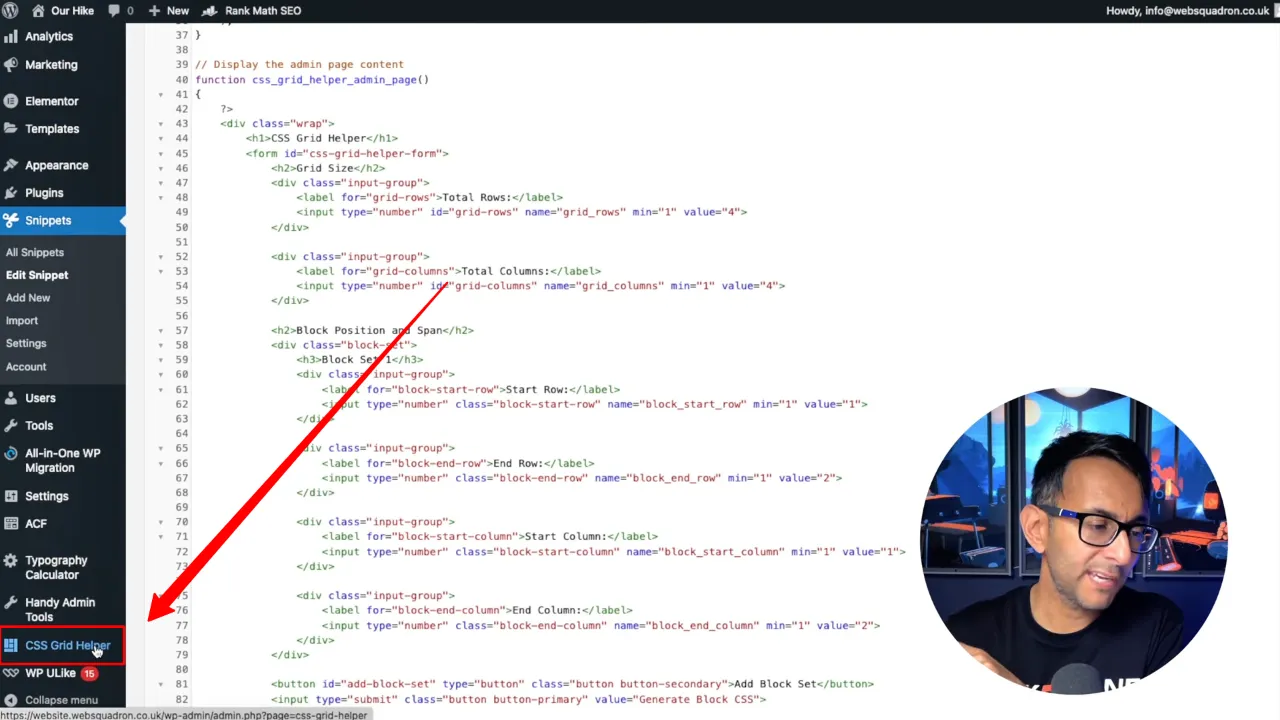
- Navigate to CSS Grid Helper.

- Visualize the grid layout using the helper tool.

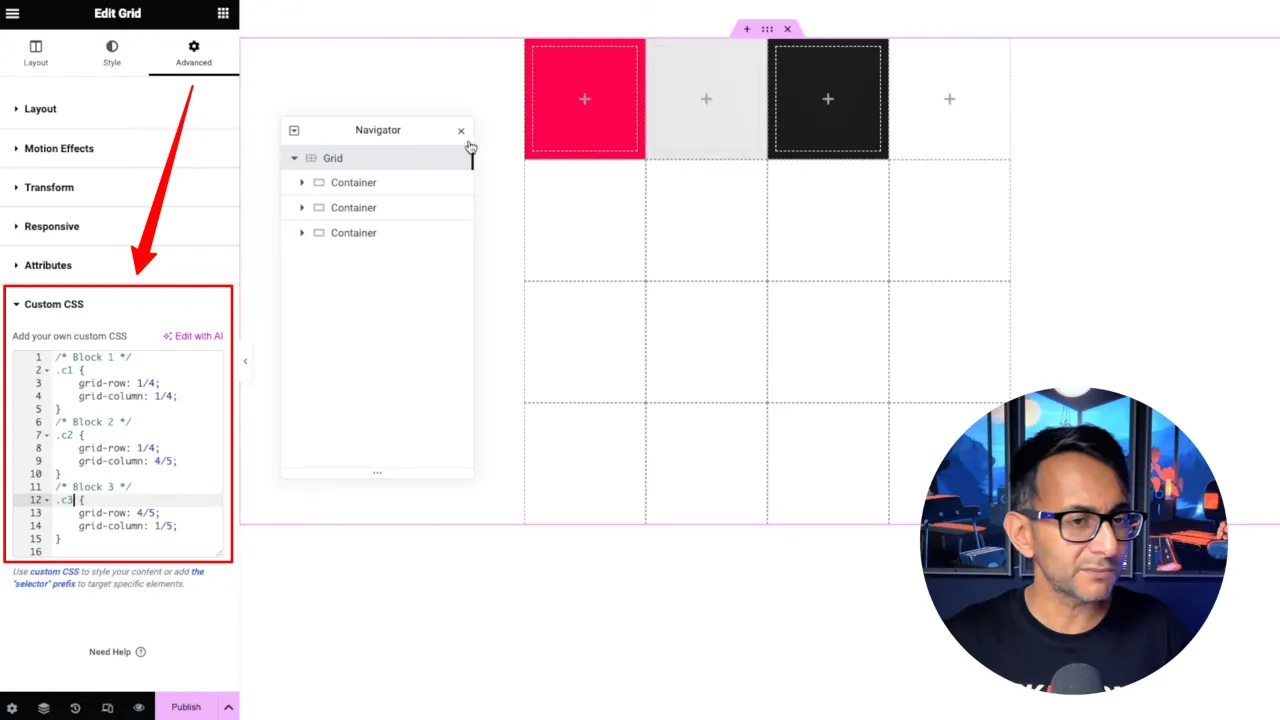
- Apply the grid layout by copying the code and pasting it into the Advanced tab > Custom CSS of your grid.
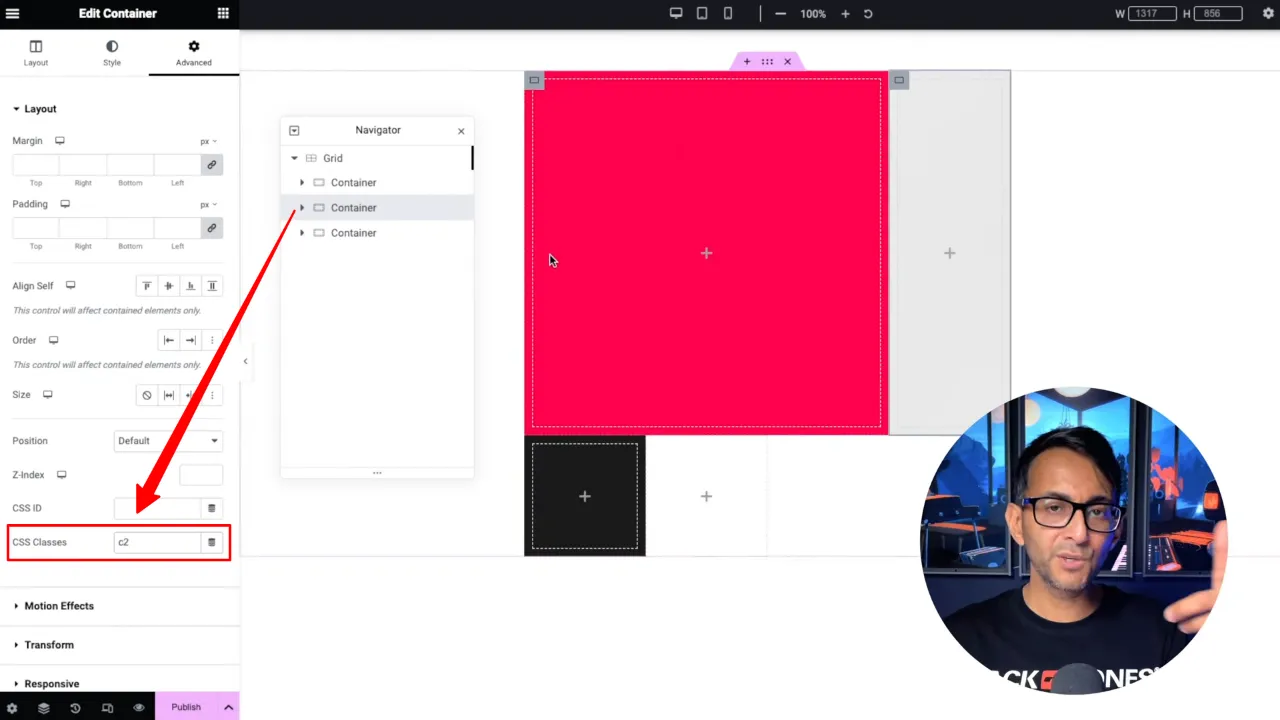
Apply the grid layout by copying the code and pasting it into the Advanced tab Custom CSS of your grid Change the selector to the CSS classes you defined for your containers Note: You will need to change “selector” to the CSS classes you defined for your containers (e.g. c1, c2, c3)
- Save and view your changes.
CSS Grid Helper – Conclusion
The CSS Grid Helper code snippet is a valuable tool for any web designer looking to leverage the power of CSS Grids in WordPress. With this guide, you can now easily visualize and implement sophisticated grid layouts.


