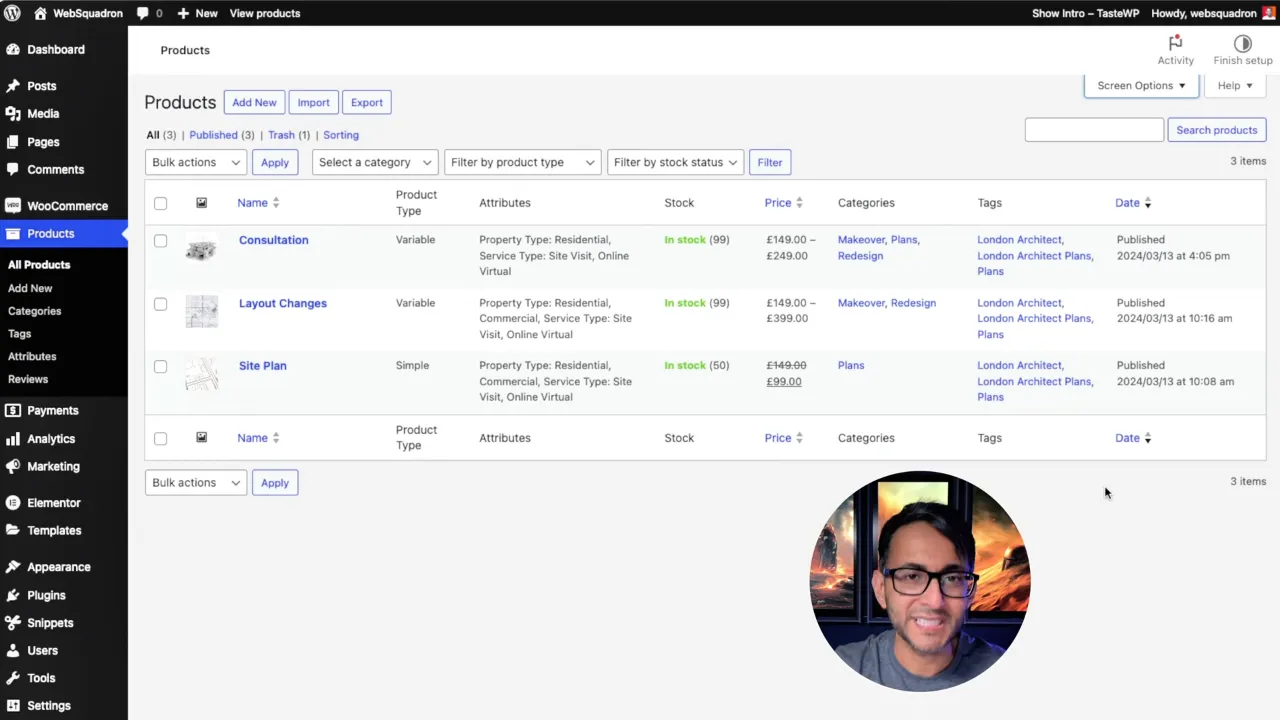
Adding WooCommerce Admin Columns can offer a clearer insight into product details such as attributes and whether a product is simple or variable. This tutorial will guide you through adding these admin columns using a code snippet approach, making your product management more efficient and intuitive.
Prerequisites
Please make sure you have the following installed and activated:
- WooCommerce
- Code Snippets (or any other code snippet plugin)
Benefits of Adding Extra Admin Columns to WooCommerce
- Enhanced Visibility
By displaying product attributes and types (simple or variable) directly in the product overview, store managers can quickly grasp essential product information without needing to open each product individually. This immediate visibility can significantly speed up product management tasks and decision-making processes. - Efficient Management
For online stores with extensive product listings, navigating through products to find specific attributes or types can be time-consuming. These snippets simplify this process by bringing important information to the forefront, thereby facilitating easier sorting, filtering, and overall management. - Customization
Every online store has unique needs based on its inventory, management style, and customer base. Custom admin columns allow store owners to tailor the product overview to better suit these needs, focusing on the information that is most critical to their operations. - Streamlined Workflows
By reducing the need to click through to individual product pages for certain information, these snippets can streamline workflows within the WooCommerce dashboard. This efficiency can lead to quicker updates and adjustments, helping store managers keep the product listings accurate and up-to-date with less effort. - No Plugin Dependency
While there are plugins available that can add similar functionalities, using code snippets provides a lightweight and straightforward solution without the need for additional plugins. This means less bloat on your website, faster loading times, and a reduced risk of plugin conflicts.
Instructions for Additional WooCommerce Admin Columns
- Navigate to Code Snippets > Add New to create a new snippet. Give it a title e.g. ‘Add Attributes as Admin Column’.
- For an attribute admin column copy the following code:
function add_product_attributes_column( $columns ) {
    // Add a new column for attributes after the 'name' column
    $new_columns = array();
    foreach ( $columns as $key => $title ) {
        $new_columns[ $key ] = $title;
        if ( 'name' === $key ) {
            $new_columns['product_attributes'] = __( 'Attributes', 'your-text-domain' );
        }
    }
    return $new_columns;
}
add_filter( 'manage_edit-product_columns', 'add_product_attributes_column', 10, 1 );

// Populate the custom column with product attributes
function show_product_attributes_in_column( $column, $postid ) {
    if ( $column == 'product_attributes' ) {
        global $product;
        // Ensure we have a product object
        if ( !is_a( $product, 'WC_Product' ) ) {
            $product = wc_get_product( $postid );
        }

        if ( ! $product ) {
            echo '';
            return;
        }

        // Get the product attributes
        $attributes = $product->get_attributes();

        if ( !empty( $attributes ) ) {
            $attributes_list = array();
            foreach ( $attributes as $attribute ) {
                // If the attribute is a taxonomy
                if ( $attribute->is_taxonomy() ) {
                    $values = wc_get_product_terms( $product->get_id(), $attribute->get_name(), array( 'fields' => 'names' ) );
                    $attributes_list[] = wc_attribute_label( $attribute->get_name() ) . ': ' . join( ', ', $values );
                } else {
                    // For custom product attributes
                    $attributes_list[] = wc_attribute_label( $attribute->get_name() ) . ': ' . $attribute->get_options();
                }
            }
            echo join( ', ', $attributes_list );
        } else {
            echo __( 'No attributes', 'your-text-domain' );
        }
    }
}
add_action( 'manage_product_posts_custom_column', 'show_product_attributes_in_column', 10, 2 );
Source: Code Snippets Cloud
- For a product-type admin column copy the following code:
// Add a new column for 'Product Type' to the Products page in the admin dashboard
function add_product_type_column($columns) {
    // Insert the 'Product Type' column after the 'name' column
    $new_columns = [];
    foreach ($columns as $key => $title) {
        $new_columns[$key] = $title;
        if ('name' === $key) {
            $new_columns['product_type'] = __('Product Type', 'your-text-domain');
        }
    }
    return $new_columns;
}
add_filter('manage_edit-product_columns', 'add_product_type_column', 10, 1);

// Populate the 'Product Type' column with the type of the product
function show_product_type_in_column($column, $postid) {
    if ($column == 'product_type') {
        $product = wc_get_product($postid);
        if (!$product) {
            echo __('N/A', 'your-text-domain'); // Display N/A if product is not found
            return;
        }
        // Display the product type
        echo ucfirst($product->get_type()); // Capitalize the first letter
    }
}
add_action('manage_product_posts_custom_column', 'show_product_type_in_column', 10, 2);

// Custom CSS to adjust the width of the 'Product Type' column to 15%
function custom_admin_column_widths() {
    echo '<style>
        .wp-list-table .column-product_type { width: 6% !important; }
    </style>';
}
add_action('admin_head', 'custom_admin_column_widths');
Source: Code Snippets Cloud
- To reduce the product name column width copy the following code:
function custom_admin_product_list_column_widths() {
    echo '<style>
        .wp-list-table .column-name { width: 14% !important; }
        //.wp-list-table .column-sku { width: 10% !important; }
        //.wp-list-table .column-stock { width: 15% !important; }
        //.wp-list-table .column-price { width: 10% !important; }
        // Add more columns as needed
    </style>';
}
add_action('admin_head', 'custom_admin_product_list_column_widths');
Source: Code Snippets Cloud
- Save and test the snippet(s).

Official Documentation
Additional WooCommerce Admin Columns – Conclusion
By following the steps outlined in this tutorial, you’ve successfully added custom columns to your WooCommerce product overview in the WordPress admin. This enhancement not only provides a quicker way to view product attributes and types but also streamlines the management process, making it easier to maintain and update your online store. Remember, customizations like these allow for a more personalized and efficient dashboard tailored to your specific needs.


